Medium Format Forum

Register a free account now!

If you are registered, you get access to the members only section, can participate in the buy & sell second hand forum and last but not least you can reserve your preferred username before someone else takes it.

Focus Testing for V system

I've been reading a lot lately about the AF lens testing products like Lens Align. These products will test your DLSR bodies and AF lenses to determine if they are focusing correctly, or are experiencing back or front focus problems, which I understand is quite common. As best I can see, these products are aimed at AF cameras, and particularly those late model DSLR's that have micro focusing adjustment capabilities.

I was wondering if anyone out there has successfully tested the focusing accuracy of V system bodies & lenses, and if so, how'd you do it. Also, if there is a focusing alignment issue with the body, what kinds of expenses (US $) do you think we're talking about?

Michael H. Cothran
 
V series body and film or digital back alignment.

Hello Michael,

This is a subject where only experienced technicians with fully equipped
workshops can deliver the kind of quality we are looking for.

Body alignment asks for tools to: adjust the mirror, check front to back for true parallel alignment and correct distance to the film plane, and correct film plane in the backs or the right amount of shims in a DB.

Without these tools and the knowledge and experience to handle them all attempts to do these jobs are useless.

How far you want to or can go depends also on the way a technician sees his job.

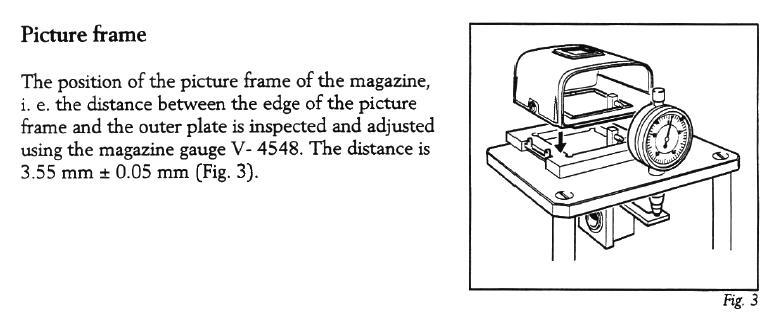
This testing rig is a rarity in the US. Only Hasselblad USA seems to have one in the US.

38721.jpg


In Europe several service centers have this item.
It is used to check the correct alignment of the film plane with all film backs.
To my surprise HB USA only seems to use this rig to check damaged film back for insurance purposes.
Experience has shown all backs doe benefit from a check up and alignment after about five years even those with moderate use.
A dropped film back will need to be checked in all cases.

Alignment and its effect on correct focus was discussed thoroughly at this forum several years ago.
I remember Austin Franklin could hardly believe this procedure is not followed in the US.

I had the pleasure to help several users to have their film backs checked and corrected.
All have reported an improvement in correct focus.
The user who does a lot of aerial photography noted a remarkable improvement with his images.

Paul
 

Attachments

  • 38721.jpg
    EXIF
    38721.jpg
    37.7 KB · Views: 26
Paul - Thanks for replying - your response addresses issues applying to misalignment of the film back. Could this also apply to a digital back? Furthermore, couldn't the mirror mechanism in the body also be a culprit?
Here's a "what if" situation - What if your film backs and your digital back were all yielding not-so-sharp images when shot wide open.
Where would you begin?
Michael
 
Alignment of bodies and film backs.

Hello Michael,

I would start with the body, especially if that is one from the "early" series.
It may be useful to explain the difference between bodies that have the later GMS with larger mirrors and older bodies with smaller mirrors.

Early bodies have foam strips that absorb energy from moving mirrors.
Later bodies with GMS have roller bearings to move the mirrors and a different mechanical system to absorp energy from moving mirrors.

It is vital that older bodies are serviced every 15-20 years to have new foam strips fitted.
After that the mirror and focusingscreen need to be adjusted so that in focus on the screen coincides with perfect focus at the film plane or sensor of a DB.

Later bodies with GMS have less problems in this department and only need service after "high mileage" or better very strong use and many exposures.

There have been problems with DBs that were not correctly aligned resulting in OOF images.
These backs need to be adjusted by the company that made them if they are not Hasselblad backs.
This is especially important for foreign backs with adapters to fit them on Hasselblad bodies.


Early bodies with foam dampened mirrors are: 500C, 500CM, 503CX, 503CXi, 501C and their motordrive versions: 500EL, 500ELM.

Later bodies that have the GMS system: 501CM, 503CW, and motordrive bodies 500ELX, 553ELX and 555ELD.

The first bodies to receive the larger mirror are the ones from the 2000 series starting with the 2000FC in 1976.
At the time the 2000 series was introduced the GMS name was not known yet.
GMS stands for Gliding Mirror System.

1600F and 1000F bodies have a different system that can not be compared with later bodies from the 500 series.

Please note fitting a screen adapter like the 41050 or 41057 to a body in an attempt to adjust the focusing screen is not recommended.
This is not a guarantee that the screen in the camera will be aligned correctly.
The other often used method to adjust a focusing screen by fitting a lens set to infinity and selecting a distant object to align the viewing screen is not recommended.

I hope this explanation makes clear that service and alignment of bodies is best left to specialists with the right training and tools to do the job.

The only independent service facility I know in the US is David Odess.
David is factory trained and has the necessary tools to do a good job.
His work is impeccable and does not differ from standards applied by Hasselblad. However the price does.


Paul
 
Thanks Paul. I have no intention of ever messing with my equipment in that way. If I detect that something may be out of whack, I need a direction in which to go. You have helped greatly, and I will remember David Odess, whose name you have mentioned before.
BTW - I have a 501CM.
Michael
PS - As a predominant landscape photographer, I don't ever shoot wide open - just the opposite - f11:f16 usually. However, after shooting a few things wide open recently with the CFV, I noted a lack of sharpness on the unprocessed TIF files, and it occurred to me that maybe something is not right. Since I normally shoot stopped down, it's possible that any focusing errors in the past were being camouflaged by the smaller apertures.
Then again, I may be expecting too much from my system.
Thanks again,
Michael
 
Hello Michael,

Shooting wide open should give excellent sharp images with a CFV.
If you have doubts it may be usefull to have correct alignment of the body and and focusing screen checked.

Jürgen is a motivated user of the CFV and will confirm the excellent properties of this back with lenses at full aperture.
Do not settle for just about right, focus is focus!

Paul
 
Paul (and anyone else interested),
I did some focus testing yesterday, and all seems well. The problem lies in my inability to focus accurately with the PME 51 prism. I have a BrightScreen focus magnifier for it, but it seems to only be about a 2X, and it has a great deal of visible chromatic aberration when viewing from any angle other than straight forward. Plus the area of focus in it is so tiny, it's really not all that useful.
For my test, I took off the prism finder, and placed a Rodenstock 4X loupe directly onto the Acutte-Matte D screen. This, of course, requires you to remove the CFV back in order to slide off the prism or WLF. I don't like doing that. However, this technique turns out to be my most accurate way focusing, It's just not that convenient, especially outdoors, and it's just not prudent to keep removing and replacing the back. But if I have a greater chance of accurate focusing this way, I'll make it work.
Michael H. Cothran
 
Getting Older

We are all getting older and with age certain things like less acurate eyesight have to be accepted.

Maybe the DPS 4x4 finder is a good solution for you.
It allows you to see the complete image of the CFV back and has 5,5 magnification.
Diopter adjustment -2,5 to + 0.5 is built in.
This finder is no longer available from Hasselblad so it will be hunting ebay etc.
Some of these finders were supplied from new with a defective diopter adjustment.
This problem is not difficult to correct.
The lens tube has become out of range of the thread that allows it to be moved.
Adjust this part and the diopter correction is available again.
Hasselblad part number for the DPS finder is 72534.

Paul
 
Michael

I use the DPS 4x4 finder and am very pleased with that finder . The RMfx together with the SWC screen adapter is also a good solution , when shooting with the SWC (tripod shooting) . When working with my LF ARCA SWISS , I have two HASSELBLAD adapters attached to the ARCA ROTASLIDE , and here I also use the RMfx , but with the standard screen adapter .

You could try Robert White in England for a DPS . Thats the dealer , I got mine from .

All digital images need to be sharpened after converting them from RAW to DNG or TIFF .
I work with PHOCUS , but have also FLEXCOLOR installed .
I just had a look in both programs for the standard sharpening values (set by program) and they are the same in both programs . (german version , so I do not have the correct english names)
They are as follows : Stärke = 100% , Radius = 1,0 , Schwarz Limit = 10 .

You can of course change these values , if desired .
I convert all my images to TIFF and never use DNG .
I then do the final sharpening , which can be very different for the different images , in PSCS4 .

Jürgen
 
Jurgen,
Thanks for your response.
I believe the English translation for your German PS terms are Amount, Radius, and Threshold.

Your response leads me to this inquiry -
I don't understand where you sharpen in Flexcolor? I can't find a sharpening tool or filter there. Where is it? Secondly, since it's still a RAW file in Flexcolor, how can that be sharpened there?
Forgive my ignorance of Flexcolor, as I usually load my .fff file there, then save as a TIF, without any corrections. All corrections are then done either in ACR or CS3. It's always good to hear of another's workflow - I'm always willing to learn a better or different way!!
And thanks about the finder info.
Michael
 
Michael

First of all : the resolution of the images displayed in FLEXCOLOR is not as good as in PHOCUS .

Now , to see , how much USM is done in your FLEXCOLOR as standard , do the following :
On the TOP of your screen you have the FELXCOLOR bar . Very left is FLEXCOLOR , DATEI , BEARBEITEN , IMAGE , DISPLAY , SERVICE and on the very right side of the bar you will find WINDOW .
Click on WINDOW . You will find in the fourth position : SHARPENING . Click on that .
You will see a little window dislayed , in which you will find the values , we were talking about .
These values can be changed to whatever you want .
I found the very same values also valid for PHOCUS as a kind of preset .

Flexcolor or Phocus convert the 3FR coded images into 3fff coded images , which can be made visible in Flexcolor or Phocus . I use the preset sharpening values .
From there , I export the files in 16bit RGB TIFF mode to my image destination .
Then in PSCS4 (and LR2.3) I do the rest of the desired modification .
This includes , that all my image data are getting converted into the LstarRGB V.2 profile .
 
Michael
On the TOP of your screen you have the FELXCOLOR bar . Very left is FLEXCOLOR , DATEI , BEARBEITEN , IMAGE , DISPLAY , SERVICE and on the very right side of the bar you will find WINDOW .
Click on WINDOW . You will find in the fourth position : SHARPENING .

Thanks - therein lies the problem. Under WINDOWS, my fourth position down is TEXTURE, not SHARPENING. Furthermore, there is no SHARPEN at all. However, out of curiosity, I clicked on TEXTURE, a new window opened, and it was a sharpening window. Now I know where it is.
Thanks - I never would have thought to open TEXTURE without your response.
Michael
 
Back
Top